
Transforming a 1950's Cape Cod: Latest Updates from Our Lake Michigan Remodeling Project
- Carrie Lucke
- Jun 28, 2025
- 6 min read
Updated: Aug 9, 2025
As summer rolls in along the shores of Lake Michigan, we're excited to share the latest update on our remodeling journey of a classic 1950s Cape Cod home nestled in Whitefish Bay, Wisconsin. This phase marks a major milestone in the project: the rough-in stage — the unsung hero of every renovation that lays the groundwork for comfort, safety, and function.
We passed rough inspection this week!!! Yeah!! And hats off to LaBonte Construction and all their incredible employees and subcontractors who played a part in making it happen on time.
What is the Rough-In Stage?
For those unfamiliar with construction lingo, the “rough-in” refers to the installation of essential systems within the walls, ceilings, and floors — HVAC (heating, ventilation, and air conditioning), plumbing, electrical wiring, and tech infrastructure. While it’s not the most glamorous part of a renovation, it’s absolutely foundational. Once drywall goes up, all of this work is hidden, so it's critical to get it right the first time. This is definitely not the "pretty" or "fun" phase for a designer like me or a homeowner - and in this project, I am wearing both hats. But - it's also a very important stage as it lays the foundation for everything that follows. It's imperative to get the locations and specifications correct.
Hot Tip - Make sure you have a full set of specs on hand, both digital and printed. Keep the printed set onsite for your tradespeople to reference. Stop by daily and give them your cell in case they have questions. No matter how good your plans are, things come up. You or your designer or architect need to be available to direct what you want, or you will be at the mercy of their best guess. Just the reality! They would prefer you to be there and tell them what you want. They don't want to guess... but they will if you are not there!
As a designer, we help your builder with a complete set of specs and site visits to make sure everything is going as desired.
Trades will have questions about locations of sconces, the height of your shower head, and the space needed for your recessed medicine cabinet. This is your chance to make every light switch do what you want it to, the height of your TV just the way you like it, and the hood vent work as well as possible. It may seem boring, but this is the phase that lays the foundation for the rest of the renovation you have dreamed of.


HVAC Rough-In
Older homes like this Cape Cod often have dated systems that can’t keep up with today’s standards of efficiency or comfort. We’ve replaced much of the original ductwork and rerouted airflow to better serve the reimagined floor plan. Zoning has been added for more targeted heating and cooling, which is especially helpful in a house with dormers, nooks, and varying ceiling heights.
Given the home’s proximity to Lake Michigan, we also focused on humidity control and air quality — ensuring that every season is comfortable without overtaxing the system. We added humidification for winter comfort and a dehumidifier in the main first-floor furnace for comfort in the summer and better consistency in humidity levels to maintain the woodwork and prevent excessive cupping or cracking.
Lessons Learned -
To be honest, this was a renovation failure on our part as homeowners. We planned for a new relocated furnace to service the second floor. Anticipating uneven usage of various rooms, my husband wanted multiple zones. We chose the zones without enough thought. Then, when I made a site visit to work with the electricians on decorative lighting placement, I saw the walls marked for thermostats in odd places—not visually considered at all! I had not even given thought to the idea that 3 zones meant 3 thermostats on my walls! YUCKY!... no thank you. Yet it was too late. I was committed to 3 zones. What could I do? First, I talked to the HVAC contractor, and we thoughtfully relocated the thermostats so they would be less visually impactful and in the most useful locations. Next, I upgraded the thermostats from what was standard and "included" to providing a set of Nest thermostats that are prettier, smaller, and can be controlled from my phone.
Hot Tip - you can still get the older Nest thermostat that is NOT AI integrated. The newer AI versions try to learn your habits and adjust automatically. No thank you! We had one and hated it. In particular, in a situation like this where we are never going to have consistent activity in the 3 zones of our second floor, it would be useless. We opted for the older Nest that just does what you tell it to by your schedule or iPhone app control. 2020 NES
T
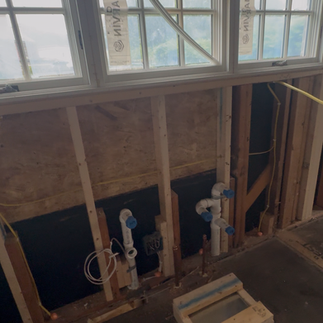
Plumbing Rough-In
From aging cast iron to undersized supply lines, the existing plumbing needed a comprehensive overhaul. We took the opportunity to install new PEX lines throughout the house and reconfigure runs to support the relocated kitchen and bathrooms.
Some exciting options include prep for a second-floor laundry, a high-efficiency tankless water heater, and outdoor plumbing stubs for a future garden faucet and potential outdoor shower. We also adjusted drain placements to optimize future cabinetry and fixture layouts.
Lessons Learned - It looks better to have your pot filler offset and not in the middle. Depending on your oven or range top, you may have a spot intended for a wok or very large stock pot. You will want to work with your plumber to make sure you have the pot filler placed in a manner that allows it to reach the largest burner easily and be of a height that clears your tallest stock pot (usually about 16" tall).
Electrical Rough-In
Rewiring an older home is never without surprises — but we were ready. We did not find outdated knob-and-tube wiring, which saved us significantly. The electrical panel has been upgraded to handle today’s power demands. Literally miles of wire were run for all the new lights and features.
We’ve added more outlets, updated switch locations to reflect the new layout, and incorporated modern safety standards including GFCI and AFCI protection. A layered lighting plan is now roughed in, allowing for recessed lights, statement fixtures, and task lighting throughout the home.
Hot Tip - In the bedrooms, it's a nice feature to have a switch for the bedside lamps that is right at the bedside. If you make it a 3-way, the lamps can be turned on and off from the entryway and the bedside. When you read yourself to sleep, you won't have to get out of bed to turn both lamps off at the same time. Amazing!
Tech + Smart Home Infrastructure
While the original 1950s build didn’t envision home automation, we made sure to future-proof the space. During the rough-in, we added low-voltage wiring for:
Whole-home Wi-Fi coverage
In-ceiling speakers
Security cameras and doorbell
Smart lighting zones
Thermostat and climate controls
PLUS
Wiring to the garage for an electric vehicle- when that day comes
All of this tech prep ensures the homeowners can integrate the smart features they want now — or easily add them later. Our tech planning started with a conversation about having a "dumb home." We were not interested in lights being turned on and off via cell phone or fancy apps to run our home. Maybe this is just because we are middle-aged? Or maybe it's just something about switching a light on and off with your hands and physically dialing your dimming request. I spend enough of my life looking for my phone... we just didn't want any of that. However, there were still some really great technologies that we did want to invest in. We are using the FRAME TV to create a clean, artful appearance of our TVs without having to build expensive and permanent cabinetry around them. We also are very excited about the invisible speakers we selected. They sit behind the drywall. Crazy??? Yeah. Now, to a true music or sound junkie who loves the perfect sound quality, this would not be the solution. But we prioritized having a clean, uncluttered ceiling and overall look to the home - yet having some speakers was nice. I can't wait to report on how they perform - and just how invisible they are.

What’s Next?
With rough-in inspections passed, we’re ready to move forward to the next big phase: insulation and drywall. Soon, the framing will give way to real walls, and the home will start to look and feel whole again. After that comes cabinetry, millwork, and finishes — the fun part!
Closing Thoughts
Though it may be hidden from view once completed, the rough-in stage is the silent backbone of a successful remodel. In this Whitefish Bay Cape Cod, we’ve taken great care to balance historic character with modern living — and we can’t wait to show you more as the project continues to take shape.
Follow along for more updates as we transform this lakeside gem!
Let me know if you'd like to include specific photos, trade quotes, or a call-to-action at the end (e.g., for newsletter sign-ups or consultations).

Comments